Basic CrowdNotifier
The basic CrowdNotifier scheme equals the scheme presented in the white paper. The scheme we present here has some modifications to incorporate some new insights that simplify the QR codes.
In this scheme, generating notifications requires cooperation of both the Location Owner and the Health Authority.
Global Setup
This document fixes specific algorithm choices for the cryptographic schemes as well as the cryptographic parameters of these schemes. We refer to the section on Cryptographic Building Blocks for the details on these instantiations. We assume these algorithms and parameters are public.
Setting up a Health Authority
The Health Authority generates a public-private encryption key pair \(\pkH, \skH\) by running \(\keygen\) of the public-key encryption algorithm. The health authority publishes \(\pkH\) and privately stores \(\skH\) at the Health Authority Backend.
This key-pair provides an extra layer of privacy protection for encrypted visits stored on a user’s phone. To decrypt these visits, an attacker would need to obtain both skH as well as the private information stored by the Location Owner.
Since we use libsodium, the health authority simply runs crypto_box_keypair to generate this key-pair.
Setting-up a Location
To set up a Location the Location Owner runs the setup program. This program will output two QR codes: a public QR code \(\qrentry\) and a private QR code \(\qrtrace\). For security reasons, this setup program must run client-side. We propose to use client-side JavaScript to statelessly generate the PDFs containing the QR codes.
The Location Owner provides a description of the location (e.g., name, address, type). Setup then proceeds as follows. It computes two IBE key pairs (one for the location, and one for the health authority)
and computes \(\masterpk = \masterpkvenue \cdot \masterpkhealth \in \group_2\). It encrypts the master secret key \(\masterskhealth\) for the health authority by creating the ciphertext \(\ctxtha = \enc(\pkH, \masterskhealth)\). It deletes and does not store the value \(\masterskhealth\). Finally, it picks a random 32-byte seed \(\seed\).
In code, the setup script computes the following values:
// Input: the public key pkha of the Health Authority

// Generate IBE key pairs
const [mpkl, mskl] = IBEKeyGen();
const [mpkha, mskha] = IBEKeyGen();

// Compute resulting master public key
const mpk = mcl.add(mpkl, mpkha);

// Compute encrypted master secret key for health authority
const ctxtha = crypto_box_seal(mskha.serialize(), pkha);

// Generate seed
const seed = randombytes_buf(32);
The setup program then encodes these values into two QR codes:
The entry QR code \(\qrentry\) containing the description of the location, \(\masterpk\) and the seed \(\seed\).
The tracing QR code \(\qrtrace\) containing the same values as \(\qrentry\) and additionally \(\masterskvenue\) and \(\ctxtha\).
To provide strong abuse-prevention properties, it is essential that the setup procedure does not store the master private key \(\masterskhealth\). By only storing the encrypted version \(\ctxtha\), both the data stored securely in the tracing QR code \(\qrtrace\) as well as cooperation of the Health Authority (to decrypt \(\ctxtha\)) are needed to compute tracing keys. As a result, the Location Owner is protected against coercion attacks.
Entry QR Code Format
Warning
The precise QR code format might see some minor updates in the near future.
CrowdNotifier adopts a standard payload format to encode data into the QR code \(\qrentry\) that is scanned by visitors. We use the following standard protobuf format:
syntax = "proto3";

message QRCodePayload {
  uint32 version = 1;
  TraceLocation locationData = 2;
  CrowdNotifierData crowdNotifierData = 3;

  // Country-specific location information
  bytes countryData = 4;
}

message TraceLocation {
  uint32 version = 1;
  // max. 100 characters
  string description = 2;
  // max. 100 characters
  string address = 3;

  // UNIX timestamp (in seconds since Unix Epoch)
  uint64 startTimestamp = 5;
  // UNIX timestamp (in seconds since Unix Epoch)
  uint64 endTimestamp = 6;
}

message CrowdNotifierData {
  uint32 version = 1;
  bytes publicKey = 2;
  bytes cryptographicSeed = 3;
  uint32 type = 4; // exact semantic tbd
}
The setup program includes the description of the location in the TraceLocation structure. It adds potential other country-specific information to the countryData field. The startTimestamp and endTimestamp denote the validity time of this QR code.
The CrowdNotifierData structure encodes the CrowdNotifier elements as described above. The publicKey field encodes the master public key \(\masterpk\) as a byte array. We use mcl’s serialization format. See the section on serialization for more details. The cryptographicSeed fields encode the 32-byte seed \(\seed\) as a byte array.
Note
The QR code format does not include a country code. Instead, apps should use the URL embedded in the QR code to deduce the corresponding country.
Finally, the payload protobuf must be encoded into a QR code. There are different methods for doing this. The most obvious approach is to encode a URL in the QR code that includes the encoded payload protobuf.
NotifyMe
The NotifyMe app encodes the following URL in the QR code:
https://qr.notify-me.ch?v=3#<base64-encoded-protobuf>
Users scan this QR code either directly with the corresponding app, or with their camera application. When the app is not installed, phones open this url in the browser. Including the payload after the anchor tag ensures that it is not sent to the server. Ensuring that the server doesn’t learn which locations the user is visiting.
Visiting a Location
Upon entering a Location, the user uses their app to scan the corresponding entry QR code \(\qrentry\) and obtain the values encoded therein. The app shows a description of the location based on the information in the locationData and countryData fields. Then the app asks for confirmation that the user wants to check in.
At this point the app stores the check-in time. After a while, the app learns that the user left the Location. Several mechanisms are possible:
That app sends a reminder to the user after at time chosen during check-in
The QR code contains a default time, and checks the user out automatically.
In both cases, it might be helpful if apps allow users to adjust the check-in and check-out times to reflect the actual time in the Location. So that the app can store the correct records, even if the user only remembers to checkout later.
Given the arrival time arrival time and departure time departure time, as well as the master public key \(\masterpk\) and seed \(\seed\) encoded in the CrowdNotifierData part of the payload, the app proceeds as follows:
The app uses the QR code payload \(\payload\) to compute the notification key \(\notificationkey\) and the time-specific identities \(\id\) using the process detailed in the next section.
The app encodes a record \(m\) capturing the arrival and departure times, as well as the notification key \(\notificationkey\):
\[m = (\texttt{arrival time},\enspace \texttt{departure time},\enspace \notificationkey)\]For each identity \(\id\) computed in step 1, the app computes the ciphertext
\[\ctxt \gets \ibeenc(\masterpk, \id, m)\]and stores it together with a label for the current day. The app does not store any of the other data computed as part of this process.
The following code-block shows an example.
// Calculate the MessagePayLoad m as a JSON string
const messagePayload: MessagePayload = {
  arrivalTime: arrivalTime,
  departureTime: departureTime,
  notificationKey: venueInfo.notificationKey,
};
const msgPBytes = from_string(JSON.stringify(messagePayload));

// Encrypt the record m using the IBE scheme
const ctxt = enc(masterPublicKey, identity, msgPBytes);
Devices automatically delete any entry older than 10 days.
Computing Identities and Keys
As part of the process to visit a Location, the app computes time-specific identities corresponding to the user’s visit to this Location. These time-specific identities correspond to time intervals that overlap with the user’s visit. Currently, these intervals are all exactly 1 hour long, corresponding to a interval length of intervalLength = 60*60 = 3600 seconds. But the following specification supports different interval lengths.
The app derives three 32-byte values \(\noncepreid\), \(\noncetimekey\), and \(\notificationkey\) from the QR code using HKDF:
\[\noncepreid \parallel \noncetimekey \parallel \notificationkey = \code{HKDF}(96, \payload, \texttt{""}, \cnversionstring)\]where the input key material \(\textrm{payload}\) is the raw protobuf (e.g., after base64 decoding, but before parsing), the salt is empty, and
"CrowdNotifier_v3"is the info string.The 32-byte
cryptographicSeedin the payload ensures that the input key material has sufficient entropy. By using the entire payload as input key material rather than only this seed, we ensure maximal entropy, even if thecryptographicSeedis shorter.The app computes a pre-identity for the Location:
\[\preid = \sha(\texttt{"CN-PREID"} \parallel \payload \parallel \noncepreid)\]The input to the hash-function is the concatenation of 3 byte arrays: the ASCII encoded 8-byte string
CN-PREIDfor domain separation, then the raw payload, and finally the 32-byte nonce \(\noncepreid\).For each supported interval length \(\intervalLength\) in seconds (currently only 1 hour, corresponding to 3600 seconds, is used) compute the interval start times \(\intervalStart\) (in seconds since UNIX epoch) for all intervals of length \(\intervalLength\) that overlap with the user’s visit. The start times must be aligned with the start of the interval, e.g.,
intervalStart % intervalLength == 0.For each interval length \(\intervalLength\) (in seconds), and interval start time \(\intervalStart\) (in seconds since UNIX epoch) compute the corresponding identity key \(\timekey\):
\[\timekey = \sha( \texttt{"CN-TIMEKEY"} \parallel \intervalLength \parallel \intervalStart \parallel \noncetimekey),\]where the inputs to the hash-function is the concatenation of the following values:
The 8-byte ASCII encoding of the string
CN-TIMEKEYThe 4-byte big-endian encoding of the value \(\intervalLength\) (
900 <= intervalLength <= 86400)The 8-byte big-endian encoding of \(\intervalStart\)
The 32-byte nonce \(\noncetimekey\).
Next, compute the corresponding time-specific identity
\[\id = \sha( \texttt{"CN-ID"} \parallel \preid \parallel \intervalLength \parallel \intervalStart \parallel \timekey),\]where the inputs to the hash-function is the concatenation of the following values:
The 5-byte ASCII encoding of the string
CN-IDThe 32-byte SHA256 output \(\preid\)
The 4-byte big-endian encoding of the value \(\intervalLength\) (
900 <= intervalLength <= 86400)The 8-byte big-endian encoding of \(\intervalStart\)
The 32-byte SHA256 output \(\timekey\)
In code, the app proceeds as follows:
// Calculate the values using the HKDF
const hkdf = require('futoin-hkdf');

const ikm = qrCodePayload;
const length = 96;
const salt = ''; // salt is empty
const info = 'CrowdNotifier_v3';
const hash = 'SHA-256';

const derivedBuffer: Uint8Array = hkdf(ikm, length, {salt, info, hash});
const noncepreid = derivedBuffer.slice(0, 32);
const noncetimekey = derivedBuffer.slice(32, 64);
const notificationKey = derivedBuffer.slice(64, 96);

// Calculate the pre-identity for the Location
const preid = crypto_hash_sha256(
    Uint8Array.from([
      ...from_string('CN-PREID'),
      ...qrCodePayload,
      ...noncepreid,
    ]),
);

// Currently only one intervalLength is supported
const intervalLength = 3600;

// `intervals` contains the `intervalStart` times for the whole duration of the
// visit.
const ids = intervals.map((id) => {
  timekey = crypto_hash_sha256(
        Uint8Array.from([
          ...from_string('CN-TIMEKEY'),
          ...toBytesInt32(intervalLength),
          ...toBytesInt64(intervalStart), // timestamp might use up to 8 bytes
          ...noncetimekey,
        ]),

  id = crypto_hash_sha256(
        Uint8Array.from([
          ...from_string('CN-ID'),
          ...preid,
          ...toBytesInt32(intervalLength),
          ...toBytesInt64(intervalStart), // timestamp might use up to 8 bytes
          ...timekey,
        ]),
    )
  return id;
  });
Initiating Presence Notification
After the contact tracing team of the Health Authority has determined that a SARS-CoV-2-positive person has visited a location during the contagious period, they proceed as follows. Let \(\entryplus\) and \(\exitplus\) be the times that the SARS-CoV-2-positive person entered and exited this location. See Fig. 1 for an overview.
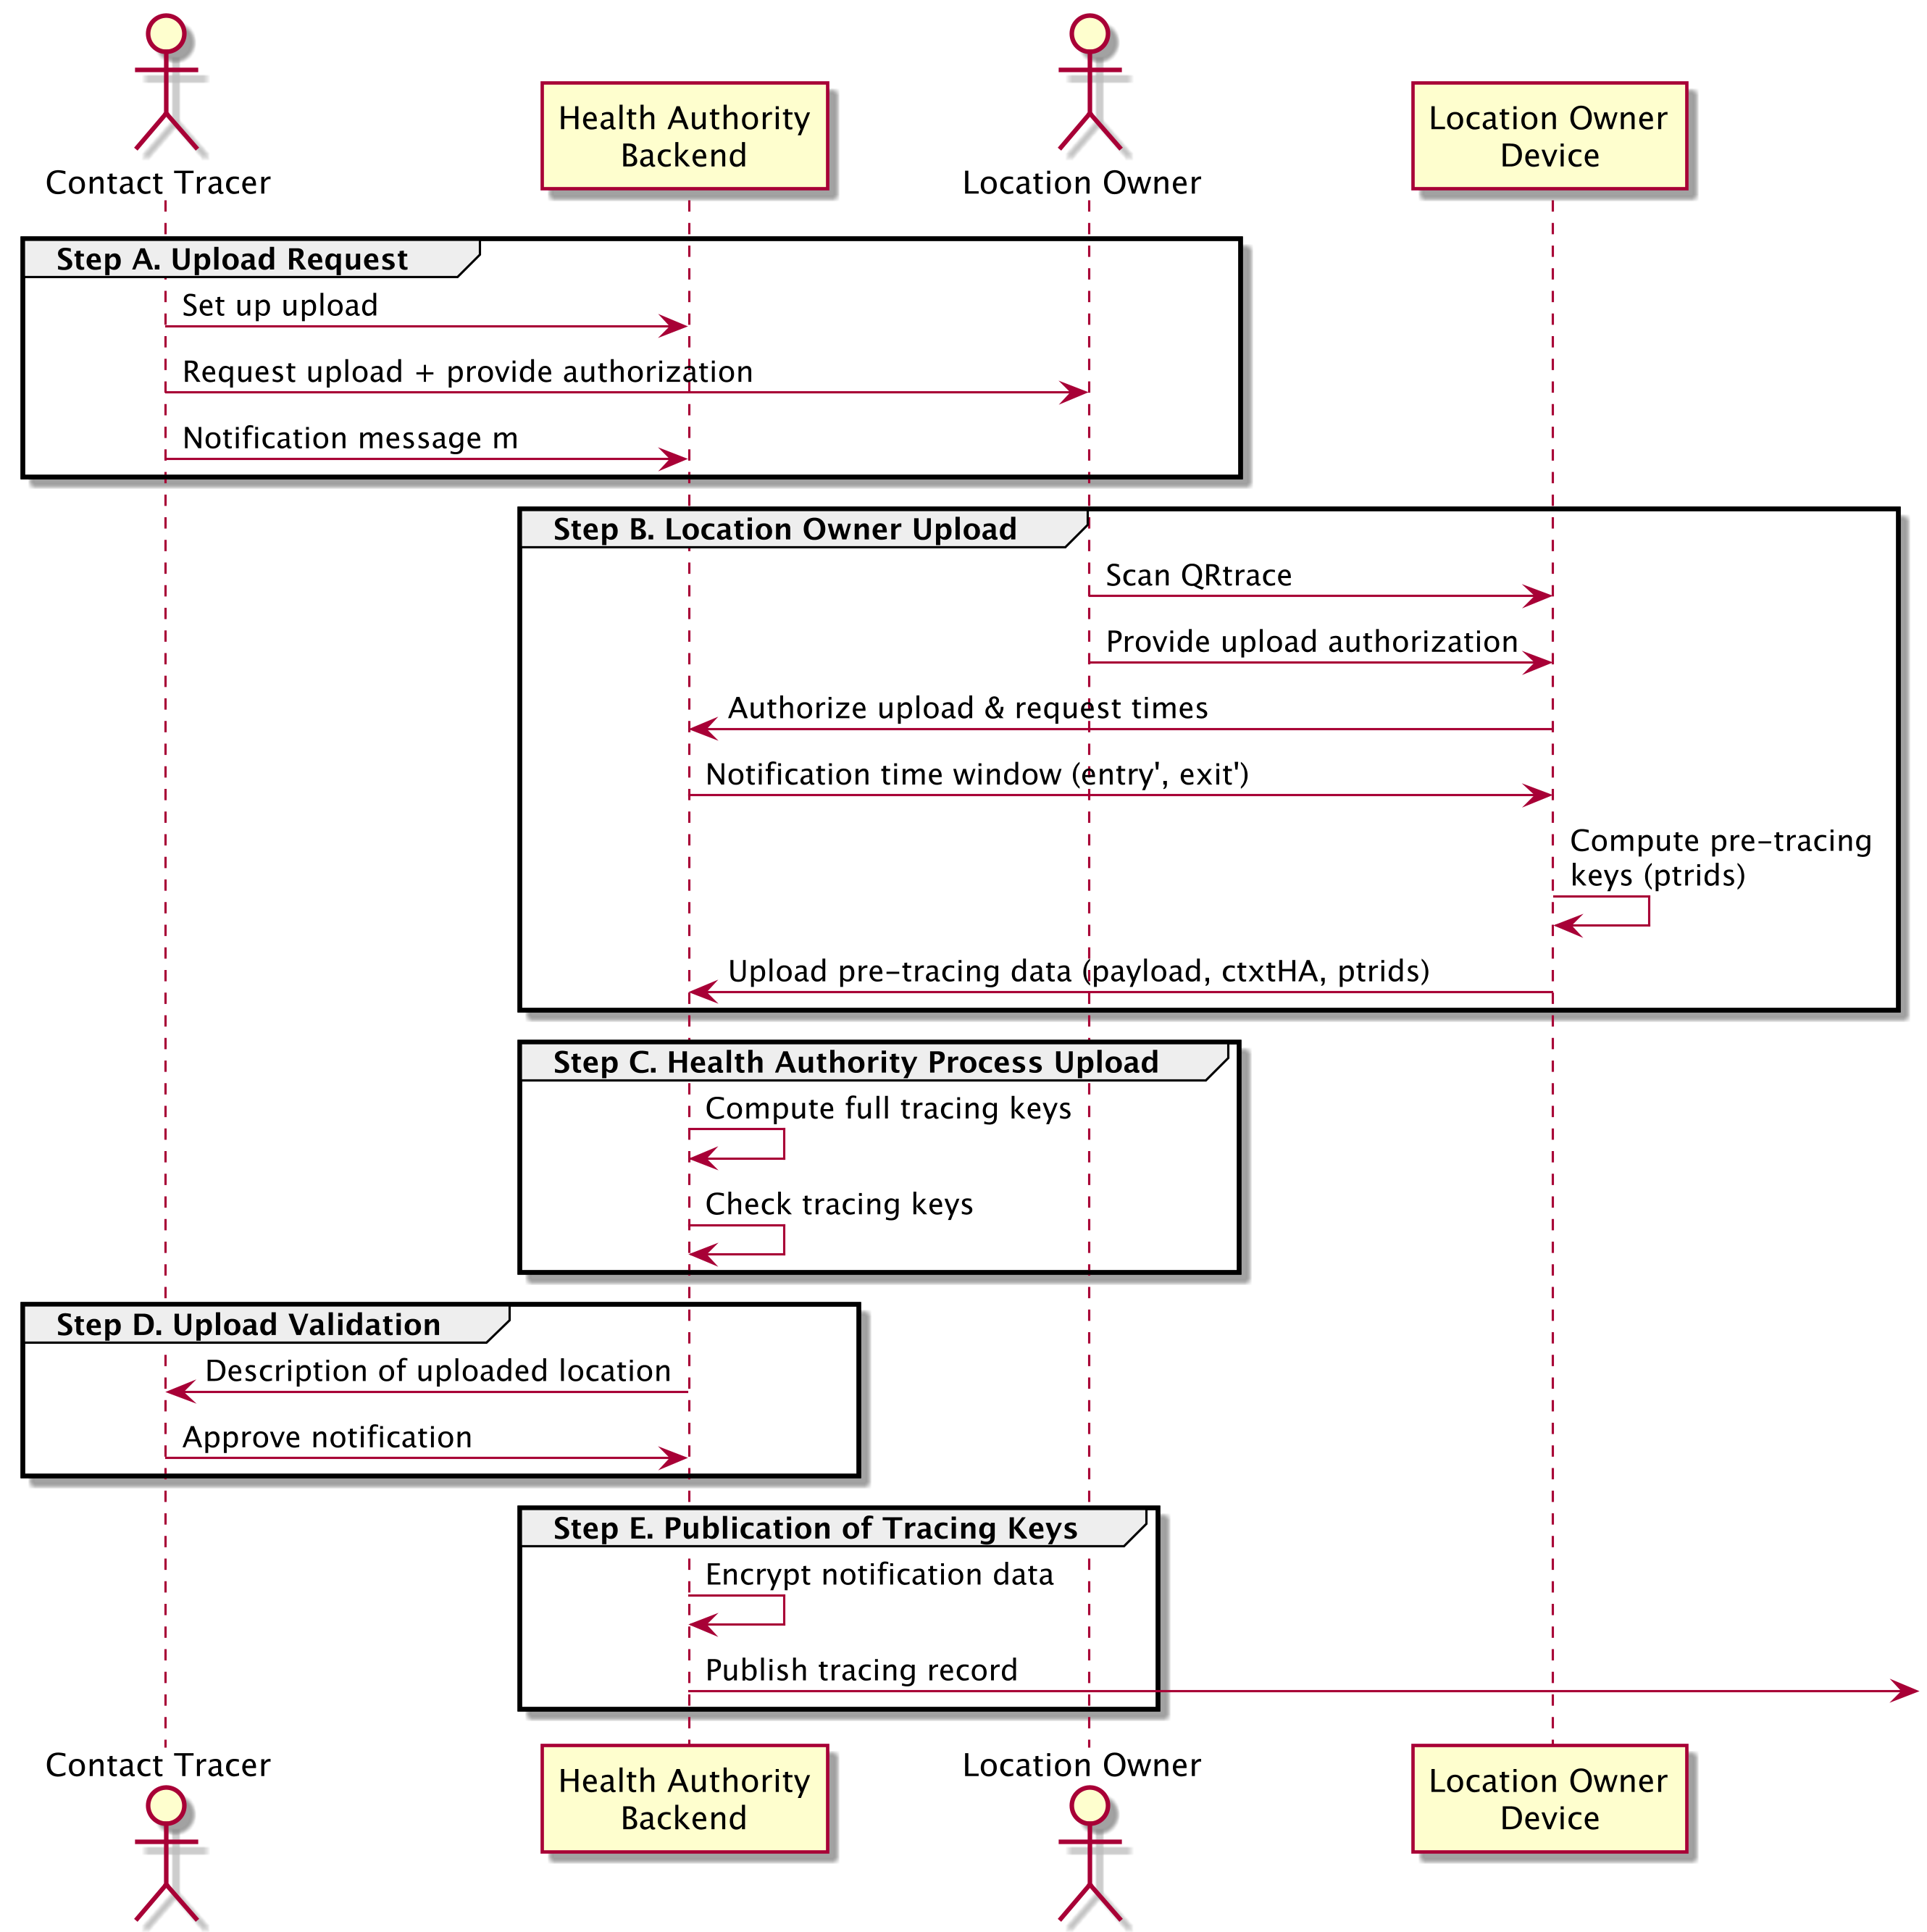
Fig. 1 Overview of process to initiate presence notification
Step A (upload request). The contact tracing team contacts the Location Owner of the Location and requests an upload of the hour-specific pre tracing keys to the health authority’s servers. They also provide the Location Owner with a means to authenticate this upload, for example a one-time token. Finally, the tracing team specifies a message \(m\) that should be sent to the notified users. They upload this message to the Health Authority Backend.
Step B (location owner upload). The location owner scans the tracing QR code \(\qrtrace\) with their app to obtain the payload \(\payload\) of the entry QR code, as well as the values \(\masterskvenue\) and \(\ctxtha\). The app then proceeds as follows
The app authenticates to the Health Authority Backend (e.g., using the one-time token) and obtains the \(\entryplus\) and \(\exitplus\) times corresponding to the index case.
The app uses the QR code payload \(\payload\) and the times \(\entryplus\) and \(\exitplus\) to compute the relevant time-specific identities \(\id\) using the process detailed in the next section.
For each identity \(\id\) computed in the previous step it computes the partial identity-based decryption key
\[\preskidvenue = \ibekeyder(\masterskvenue, \id).\]Let the pre-tracing key be \(\pretrace_{\id} = (\id, \preskidvenue)\).
The app uploads \(\payload\), \(\ctxtha\), and all pre-tracing keys \(\pretrace_{\id}\) to the Health Authority Backend.
Step C (health authority process upload). The health authority’s system processes each upload as follows.
It decrypts \(\ctxtha\) to obtain \(\masterskhealth\).
It uses the QR code payload \(\payload\) and the times \(\entryplus\) and \(\exitplus\) to recompute the relevant time-specific identities \(\id\) using the process detailed in the next section.
It parses the pre-tracing keys \(\pretrace_{\id}\) as \((\id, \preskidvenue)\) and discards any entries with identities \(\id\) it did not compute in the previous step. Next, it computes its part of the identity-based decryption key
\[\preskidhealth = \ibekeyder(\masterskhealth, \id).\]and computes the final identity-based decryption key
\[\skid = \preskidvenue \cdot \preskidhealth.\]Let \(\traceid = (\id, \skid)\).
It validates the computed tracing key \(\traceid = (\id, \skid)\). To do so, it picks a random message \(m\) of sufficient length and computes the ciphertext \(\ctxt \gets \ibeenc(\masterpk, \id, m)\), and verifies that \(\ibedec(\skid, \id, \ctxt) = m\). If the check fails, it removes the upload.
Step D (upload validation). The contact tracing team checks that the uploaded tracing-keys correspond to the expected Location. To do so, they compare the description of the location in the supplied \(\payload\) with the expected location. This validation step could happen automatically.
Step E (publication of tracing keys). To publish the tracing keys, the Health Authority Backend proceeds as follows:
The server formats creates notification data \(\notificationdata\) that contains the message \(m\) (specified in step A) as well as information about the notification interval. This package also contain extra machine-readable information such as the severity of the warning:
\[\notificationdata = (\entryplus, \exitplus, m)\]see the definition of AssociatedData below for a concrete ProtoBuf based instantiation.
Finally, the Health Authority Backend uses \(\payload\) to recompute the notification key \(\notificationkey\) and computes \(\ctxtnotificationdata = \aeenc(\notificationkey,\allowbreak \notificationdata)\), the encrypted message for the notified visitors, and for each relevant timeslot it publishes a record \((\traceid, \dayctr, \ctxtnotificationdata),\) where \(\dayctr\) corresponds to the day (since the UNIX epoch) on which this timeslot begins. See the definitions of ProblematicEvent and ProblematicEventWrapper below for concrete ProtoBuf based instantiations.
Note
As for DP3T-based application, the Health Authority Backend should publish tracing records via a CDN to facilitate downloading by millions of clients.
Data Formats
The CrowdNotifier uses the following standard encrypted payload format to encode \(\notificationdata\):
syntax = "proto3";

message AssociatedData {
  int32 version = 1;
  string message = 2;

  // UNIX timestamp (in seconds since Unix Epoch)
  int64 startTimestamp = 3;
  // UNIX timestamp (in seconds since Unix Epoch)
  int64 endTimestamp = 4;

  bytes countryData = 5;
}
This data structure follows the same structure as the entry QR code format defined above. The countryData can be used to insert other country-specific information. It is currently not used.
The per time-slot event data \((\traceid, \dayctr, \ctxtnotificationdata)\) is wrapped in a ProblematicEvent:
syntax = "proto3";

message ProblematicEventWrapper {
  int32 version = 1;
  repeated ProblematicEvent events = 2;
}
message ProblematicEvent {
  int32 version = 1;
  bytes identity = 2;
  bytes secretKeyForIdentity = 3;

  // UNIX timestamp corresponding to day start (in seconds since Unix Epoch)
  int64 day = 4;

  bytes encryptedAssociatedData = 5;
  bytes cipherTextNonce = 6;
}
Recall that \(\traceid = (\id, \skid)\). In the ProblematicEvent protobuf, identity encodes \(\id\), and day encodes the start of day (in seconds since UNIX Epoch).
The field secretKeyForIdentity encodes \(\skid\) serialized as per the specification in the building blocks section.
The ciphertext \(\ctxtnotificationdata\) is
encoded by encryptedAssociatedData and cipherTextNonce.
The ciphertext follows the libsodium encoding,
see the cryptographic building blocks for more details.
A sequence of such tuples is wrapped in a single ProblematicEventWrapper.
Presence Tracing and Notification
The user’s app regularly (say, every few hours) performs the following checks:
The app downloads all \((\traceid, \dayctr, \ctxtnotificationdata)\) tuples that were published since the last time it checked.
For each tuple downloaded \((\traceid, \dayctr, \ctxtnotificationdata)\) let \(\traceid = (\id, \skid)\). The app proceeds as follows.
For each record \(\ctxt\) recorded on a day corresponding to \(\dayctr\), the app tries to decrypt it using \(\ibedec(\id,\allowbreak \skid,\allowbreak \ctxt)\). The app selects records where decryption succeeds (i.e., those not equal to \(\bot\)).
For all selected records \(\ctxt\), the app uses the plaintext of \(\ctxt\) to recover the arrival time, departure time and the notification key \(\notificationkey\).
The app then uses \(\notificationkey\) to decrypt \(\ctxtnotificationdata\) and recover:
\[\notificationdata = (\entryplus, \exitplus, m)\]if decryption fails, it moves on to the next matching tuple.
The app checks if there is an overlap between the user’s time at the location and what is indicated by \(\entryplus\) and \(\exitplus\). If there is an overlap, the app uses \(m\) to notify the user.